

my search for slowness
We live in an era of speed, with more information available at our fingertips than ever before. The pressure to do more and become more at an astronomical pace is pervasive—something I’ve had to consciously resist in both my teaching practice and in life.
In an effort to resist the race from concept to concept, level to level, I have an ongoing goal to add more slow, exploratory, student-centered approaches to my teaching repertoire. Students remember new topics when they are actively involved, and my teacher burnout level stays the lowest when I spend my time creating learning experiences rather than simply telling students what I want them to know.
Three topics consistently pinged on my “this is not working” radar — a sure sign that my lesson planning needed more thoughtful preparation. Using the metronome, making clefs and landmark notes more memorable, and fielding questions about how a piano works are three topics that I have re-worked my approach to, favoring a slower and more careful way of introducing them to students—and it’s working!
Preparing for the Metronome
Different uses for the metronome is an entire blog topic of its own, but my short philosophy about metronomes revolves around a single idea: the metronome validates a student’s sense of steady beat, but it does not develop it. With that in mind, I ensure that students are able to do a variety of movement and chanting activities that require them to keep the macrobeat and microbeat both alone and simultaneously before they ever see a metronome. I also have students tap the macrobeat while I tap its different divisions. Then, it’s time to think carefully about the student’s first experience with the metronome.
First, we take our time exploring what a metronome can do. It’s so often the outwardly simple things that involve more than meets the eye. Of course, the metronome keeps a beat. But where do the numbers come from? Which beat or note value does the click represent, and why? Do we only use the metronome to keep a beat? How do we actually listen to the metronome while playing? I never introduce the metronome without anticipating the questions students will ask and what they will naturally want to experiment with. Some discussion points and activities that are worth the time include:
60 BPM chimes exactly with the second hand on a clock; we set the metronome to that speed and watch the analog clock on the wall in my studio. We experiment with doubling that number (120 BPM), then cutting it in half (60 BPM) and talk about what we observe. I want this to hint at the idea that the metronome can be set to the half note, eighth note, or other divisions and elongations of the beat. The sound can represent more than one thing!
We tap common rhythmic patterns with the metronome set to adagio, andante, and allegro.
We play a familiar piece with the metronome set to the quarter note at a comfortable tempo, then experiment with playing the same piece much slower and a bit faster than usual, still with the quarter note as the beat. As a stepping stone to playing with the metronome set to the whole note, half note, eighth note, and so on, I simply tap those values on their shoulder while they play.
We tap rhythms from already-completed sight-reading cards with the metronome set to a comfortable tempo while counting aloud, then try this process with new sight-reading material.
We repeat variations of these activities for several weeks, taking the time to build students’ self-efficacy before students are assigned metronome work in at-home practice. The more confident students are in their ability, the more likely they are to practice it at home!
Exploring How a Clef Actually Works
I didn’t fully understand the underlying purpose of a clef until my first year of music school. Suddenly, I had to read, sight-sing, and complete music theory assignments in new clefs (alto and tenor clefs) that I didn’t even know existed! This changed the way I thought about reading music and became a lasting influence on my pedagogy, especially when it comes to sequencing music-reading concepts and skills.
A clef assigns pitch and letter name meaning to the lines and spaces on the staff, assigning a particular pitch to one line or space and, by association, all the other lines and spaces (including ledger lines). To ingrain this in a creative way, students have been designing their own clefs—and it’s a deep-dive activity that I have found to be more than worth the time.

A clef in which middle C aligns with the handle on a saber.

A clef in which the high A (A5) line goes through the pistil of a flower.
This activity has resulted in so many “aha!” moments—even in students who have been reading on the staff for quite some time—that I plan to continue using it every time I introduce clefs. Student-designed clefs would also add a wonderful layer of complexity to our next sight-reading card swap, where students notate sight-reading exercises for each other.
Exploring What’s Inside the Piano
Students are naturally curious about how things work, including what’s inside of the piano and the pedals—and they ask a lot of questions about what each part does. It’s easy to feel rushed when students have a lot of questions and limited lesson time. There is a lingering feeling of urgency to get straight to the music and spend as much time playing the instrument as possible, a remnant from my own experiences as a student and teacher in training. Rather than working against this curiosity, spending the time to lay a foundational understanding of how a piano works is worth it.
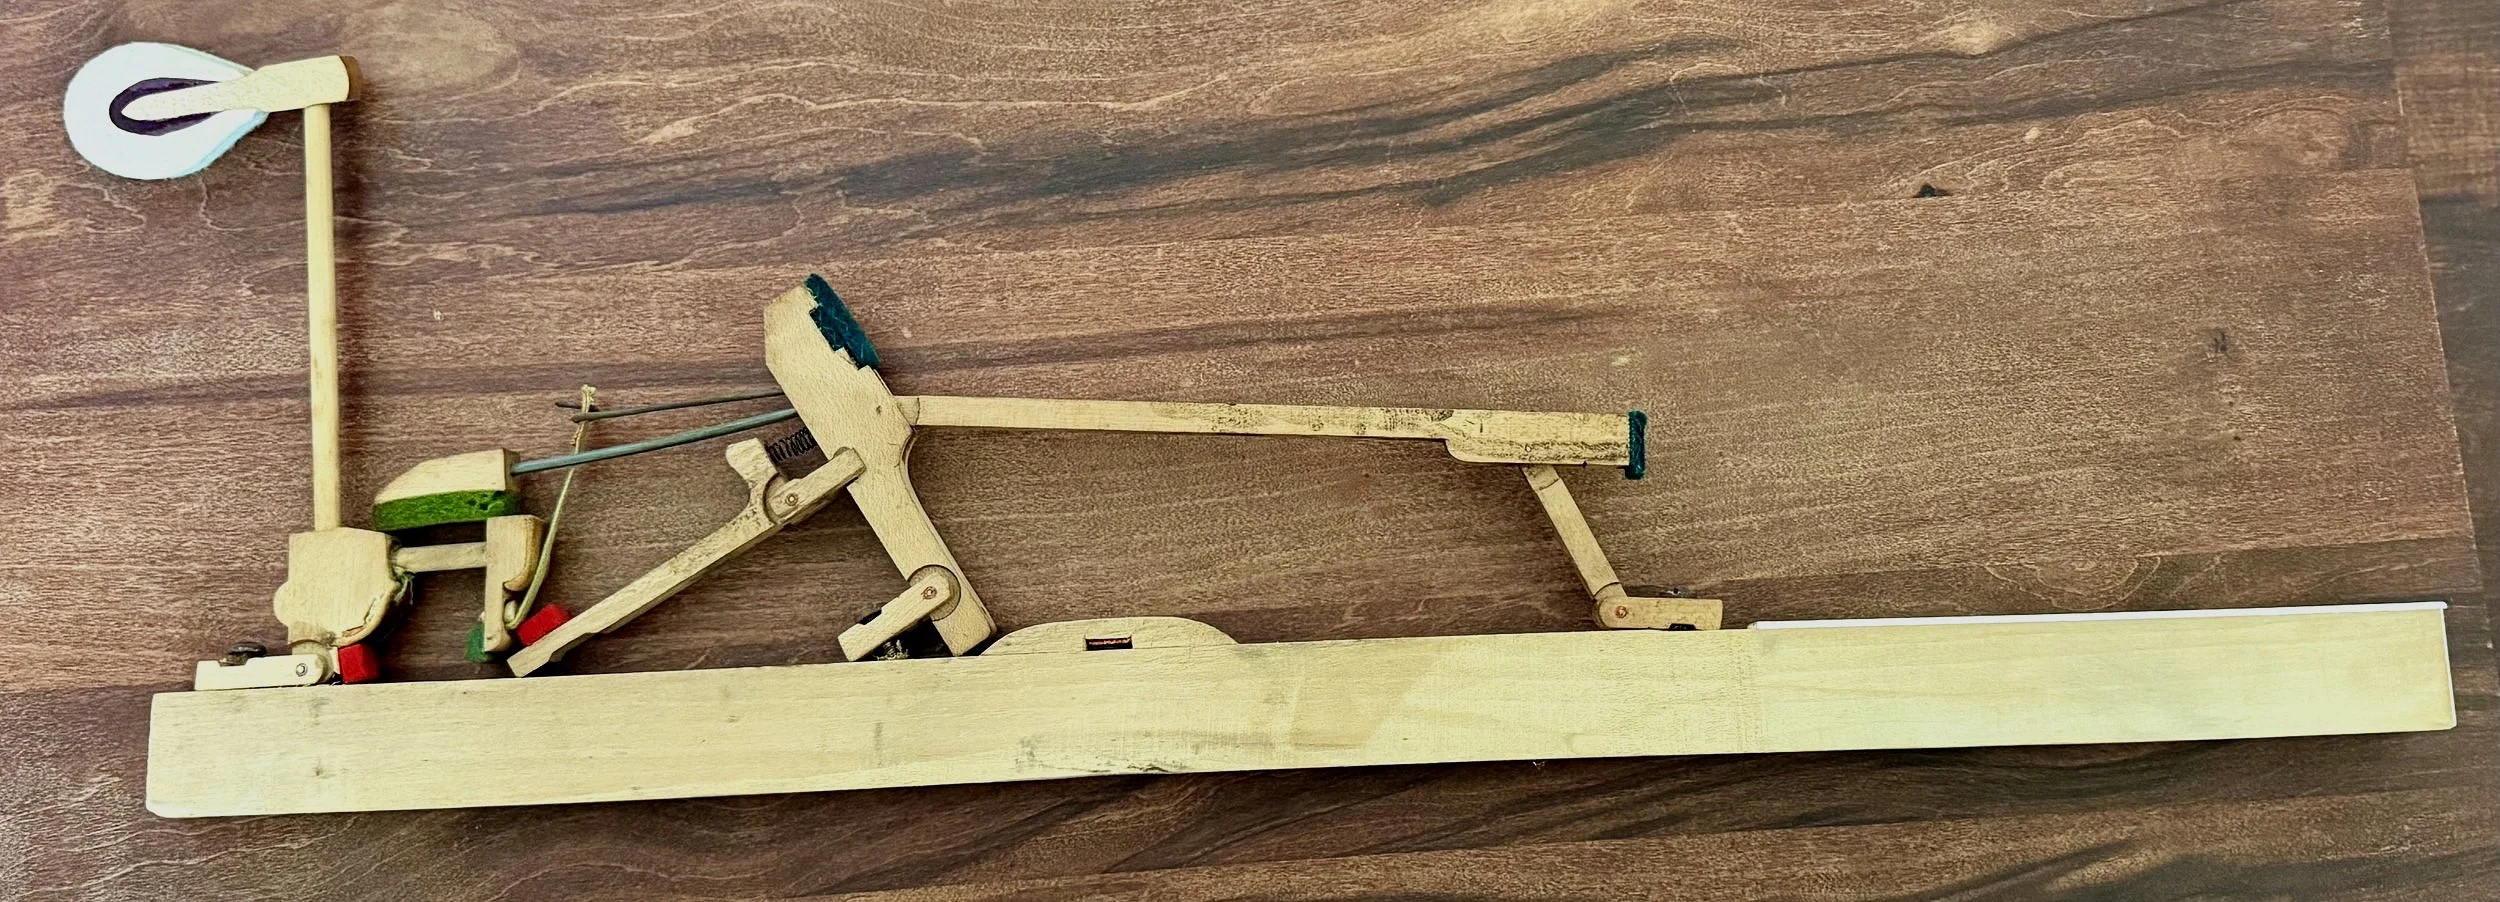
Allowing students to explore how an acoustic piano makes a sound very early in the lesson experience has become a cornerstone of my teaching philosophy. We take a peek at what’s inside the instrument; I open the lid and ask students to make as many observations as they can about the strings, hammers, dampers, pins, and anything else they notice. Students have been fascinated by the model piano action I invested in last year. Seeing the action from multiple angles and being able to feel all the parts helps students understand how their physical actions work together with the piano’s parts.
I’ve honed the language I use to discuss interacting with the piano mechanism: we don’t “press” the keys, we “strike” them to engage the machine inside; we don’t “hold” down a key, we “leave” our finger on the key, because once a sound is made, we can’t alter it, etc. These concepts are more easily understood, even by the tiniest of learners, when they can see and feel what I’m talking about.
Taking Time to Save Time?
The longer I teach, the more strongly I believe that slowness is one of the most powerful choices we can make, in the music world and otherwise. Taking time to explore, question, and interact with foundational concepts is an investment in lasting progress—one that ultimately allows us to use time more efficiently in the future.
Further Reading
A Long, Slow Look (on the blog)
In Praise of Slowness by Carl Honore